SSH Authentication and Certificate Authority
The last few years have seen rapid automation of many Systems Administration/DevOps tasks. The new mantra is if you need to ssh to a server, your automation is not working right. But even for the occasional ssh access to the servers, the SSH authentication must be managed. Over the years, SSH has added many new features/techniques to enhance authentication and put some governance around it. This article is about the use of SSH Certificate-based authentication and why every organization, using SSH, must use it.
SSH Key-based authentication (aka passwordless login) has been with us for over two decades now. The mechanism works based on public-key cryptography. One adds his/her RSA/DSA key to the authorized_keys file on the server. The user with the corresponding private key can login without a password. It works great except for a few fundamental problems:
- When a user accesses the server using ssh for the first time, s/he always gets Trust On First Use (TOFU) warning.
$ ssh -l alice mavrix5.dbsentry.com
The authenticity of host 'mavrix5.dbsentry.com (72.191.40.116)' can't be established.
ECDSA key fingerprint is SHA256:PoK81UWgOBMn6owOoHXjGoBLWqcJ4E9JCiLQyiFF60s.
Are you sure you want to continue connecting (yes/no)?
Theoretically, a man-in-the-middle attack could be launched at this point as the server is not trusted. I tried finding damaging incidents of such attacks on the internet but could not find any. Nevertheless, the possibility exists and we’d be better off getting rid of it.
- When the number of servers increases, authorized_keys files proliferate making them hard to manage. Moreover, once added they are active perpetually and have to be removed manually to block access to its corresponding private key. That is probably the reason why many security guys frown on the use of authorized_keys.
Fortunately, the newer version of SSH includes many improvements that give us the ability to centralize and better manage authorized_keys using AuthorizedKeysCommand. However, the issue with the TOFU remains. Although the solutions exist in either the use of SSHFP or SSH Certificates, their usage never caught on.
Having said that, in addition to taking care of TOFU, SSH Certificates have many more advantages/features (e.g. certificate expiration, use of principals, etc) that enhance SSH authentication governance and should be used by all organizations that use SSH.
Instead of using complex X.509 style certificates, SSH chose to use their own simpler format of certificates, which can be easily managed using CLI ssh-keygen. To use SSH certificate-based authentication one needs to set up SSH Certificate Authority (CA). So, how does one set up SSH CA?
SSH Certificate Authority
SSH Certificate authority (CA) can be set up on any computer with ssh-keygen. SSH CA is a key pair used to sign SSH Public Keys to generate certificates. The recommendation is to set up two pairs of CA keys: one for host certificates and others for user’s certificates.
Use ssh-keygen to generate CA Keys:
$ ssh-keygen -t rsa -f ca_host_key
$ ssh-keygen -t rsa -f ca_user_key
The above would generate two pairs of SSH Keys. e.g.
$ ssh-keygen -t rsa -f ca_host_key
Generating public/private RSA key pair.
Enter passphrase (empty for no passphrase):
Enter same passphrase again:
Your identification has been saved in ca_host_key.
Your public key has been saved in ca_host_key.pub.
The key fingerprint is:
SHA256:Epoq1Vy0/orivKOwxepBLqD7mGuaWbUKh+SoycMpKy0 manish@picanmix4
The key's randomart image is:
+---[RSA 2048]----+
|      .          |
|     . .         |
|      +          |
|   o = .         |
|.o. * o S        |
|O+ o . o         |
|X=B .   .        |
|E^=. . .         |
|^XB+. .          |
+----[SHA256]-----+
$ ssh-keygen -t rsa -f ca_user_key
Generating public/private rsa key pair.
Enter passphrase (empty for no passphrase):
Enter same passphrase again:
Your identification has been saved in ca_user_key.
Your public key has been saved in ca_user_key.pub.
The key fingerprint is:
SHA256:9cW4eNS9mNUWWeSRDG9ONjMAWfOTpx9kuLfZyHEMAME manish@picanmix4
The key's randomart image is:
+---[RSA 2048]----+
|         .o+==o+*|
|          E. =**=|
|          . o.=/*|
|         . + o%=B|
|        S . ++o=o|
|           . ..==|
|              ooo|
|                 |
|                 |
+----[SHA256]-----+
$ ls -l
total 32
-rw-------  1 alice  staff  1823 Oct 30 13:19 ca_host_key
-rw-r--r--  1 alice  staff   398 Oct 30 13:19 ca_host_key.pub
-rw-------  1 alice  staff  1823 Oct 30 13:19 ca_user_key
-rw-r--r--  1 alice  staff   398 Oct 30 13:19 ca_user_key.pub
Optional: Besides, you can also setup SSH Key Revocation List (KRL). This is a list of all revoked certificates.
$ ssh-keygen -k -f ca_krl
And, that’s it. your SSH CA is in business. Now, going forward, you just need to configure your servers and clients to use certificates with private keys.
SSH Server Configuration
Follow these steps to configure a host to use SSH certificates:
- Copy your servers SSH Public Key, typically located under
/etc/ssh/ssh_host_rsa_key.pubor/etc/ssh/ssh_host_dsa_key.puband get it signed.
$ ssh-keygen -h -s ca_host_key -z <serial no.> -I <hostname> -V <duration> -n <principal list> ssh_host_rsa_key.pub
for e.g
$ ssh-keygen -vvv -h -s ca_host_key -z 100 -I mavrix2 -V +52w -n mavrix2,mavrix2.dbsentry.com ssh_host_ed25519_key.pub
Signed host key ssh_host_ed25519_key-cert.pub: id "mavrix2" serial 100 for mavrix2,mavrix2.dbsentry.com valid from 2020-10-30T14:46:00 to 2021-10-29T14:47:02
- Copy the certificate back to the host under
/etc/ssh - Copy CA User Public Key(
ca_user_key.pub) to the host under/etc/ssh - Add the following to
sshd_conffile:
TrustedUserCAKeys /etc/ssh/ca_user_key.pub
HostCertificate /etc/ssh/ssh_host_ed25519_key-cert.pub
TrustedUserCAKeys directs SSH to trust certificates signed by ca_user_key. And, HostCertificate directs SSH to send the host certificate instead of the public key to the client.
5. Restart SSH
$ sudo systemctl restart sshd
SSH Client Configuration
Follow the following steps to configure client/user to use SSH certificates:
- Copy user’s SSH Public Key (typically located under
<usershome>/.ssh/id_rsa.pub. If not present, it can be generated usingssh-keygen -t rsa) to the CA host and get it signed
$ ssh-keygen -s ca_user_key -z <serial no> -I <username> -V <duration> -n <principal list> id_rsa.pub
for e.g
$ ssh-keygen -s ca_user_key -z 100 -I alice -V +2h -n alice,apache id_rsa.pub
Signed user key id_rsa-cert.pub: id "alice" serial 100 for alice,apache valid from 2020-10-30T14:56:00 to 2020-10-30T16:57:51
You can look at the content of the certificate using the following command:
$ ssh-keygen -L -f id_rsa-cert.pub
id_rsa-cert.pub:
      Type: ssh-rsa-cert-v01@openssh.com user certificate
      Public key: RSA-CERT SHA256:2J9G7t6Dn11nKlI5l9USbHAFRTuBUUVxqbL+uHQaaDc
      Signing CA: RSA SHA256:X75sKpv1L2B6y/mIUYKZc0QVmQD8CgpcBS+ZhRPbRmk (using ssh-rsa)
      Key ID: "alice"
      Serial: 100
      Valid: from 2020-10-30T14:56:00 to 2020-10-30T16:57:51
      Principals:
              alice
              apache
      Critical Options: (none)
      Extensions:
              permit-X11-forwarding
              permit-agent-forwarding
              permit-port-forwarding
              permit-pty
              permit-user-rc
- Copy the certificate to the client under
<userhome>/.ssh - Copy CA Host Public Key (
ca_host_key.pub) to the client and put it either in known_hosts file under<userhome>/.ssh(local) or/etc/known_hosts(global) file in the following format:
@cert-authority *.dbsentry.com ssh-rsa AAAAB3NzaC1yc2EAAAADAQABAAABAQDDN4F3JKuAS1V0nQmBRNl5fS8dZS49FKUp5wwy8R0wDcNYdrq+M5/tdS6K/R07445VWpVKwExZGboaQ/YR5iQ392YHM55ThMjSP5CTywmiP033MX3zG5eO9Iec5fz/hHtwrDtxb4Xm3FfGhXjjKTozNf/uMcOjIM1STr/I6t2zfZ42bnCq4DFj1GWHSrOtnxjN0PPOfCLH+1AmKhEUFqf0NBD3CQoPamaRVf4ouAc9KxOLFge+gebJe9jmqkaVHYfZD2CPoLVGHXZCphSQ3gyEKpvgD8VnfU9/la6BNtcK9lSONZWLFcw523HdlnbGVz+t15zZAXLu/3H6yK5SPC/L
Above instructs SSH client to trust the host certificate signed by the CA. 4. Test ssh. You should not receive a TOFU warning and should not be asked for the password either. The generated certificate should work for the principals (i.e. users on the server) for the validity period.
Summation
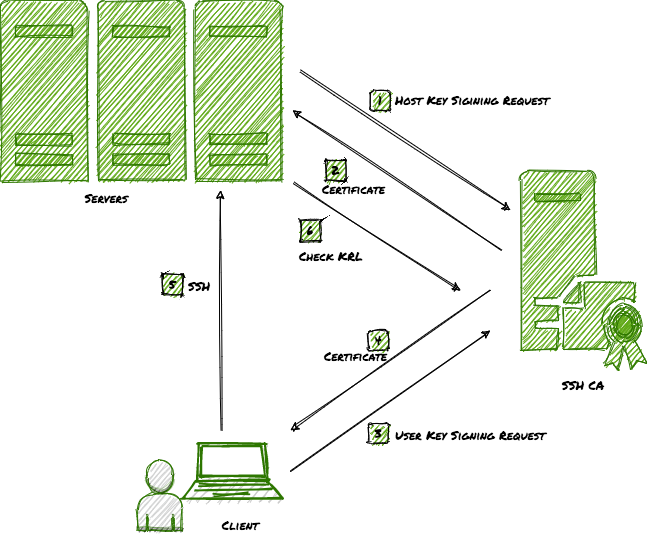
In this article, I have demonstrated the setup of SSH Certificate Authority and why and how SSH authentication uses SSH certificates.
<Shameless-Plug>
Although the use of certificates results in more secure SSH authentication, SSH CA adds the burden of ssh certificate management. One can use a centralized system such as
Keyper to ease that burden. Keyper is an Open Source SSH Key and Certificate-Based Authentication Manager, which also acts as an SSH Certificate Authority (CA). It standardizes and centralizes the storage of SSH public keys and SSH Certificates for all Linux users in your organization. It also saves significant time and effort it takes to manage SSH keys and certificates on each Linux Server. Keyper also maintains an active Key Revocation List, which prevents the use of Key/Cert once revoked. Keyper is a lightweight container taking less than 100MB. It supports both Docker and Podman. You can be up and running within minutes instead of days.</Shameless-Plug>
That’s it, folks! Happy more secure SSH’ing.